
Overview
User stories are a powerful tool for building digital products that meet the needs of your users. This post will guide you through the key steps in creating user stories, from understanding their structure to prioritising and testing them.
Outline:
- When to use user stories?
- When NOT to use user stories?
- Why User Stories Are Effective
- Components of a User Story
- Steps for Creating User Stories
- User Story Checklist
- Tips for Effective User Stories
Why User Stories?
Environmental data often involves complex scientific concepts and diverse stakeholders. User stories facilitate collaboration between scientists, product owners, developers, and users to ensure the data product or service meets real-world needs.
What are User Stories?
User stories are simple, clear descriptions of a feature or functionality told from the perspective of the user. They help everyone on the team understand and agree on what needs to be built and why. User stories can be different depending on the team that is using them and the approach described in this post is just one of many approaches you could use - feel free to adapt and customise it to your needs.
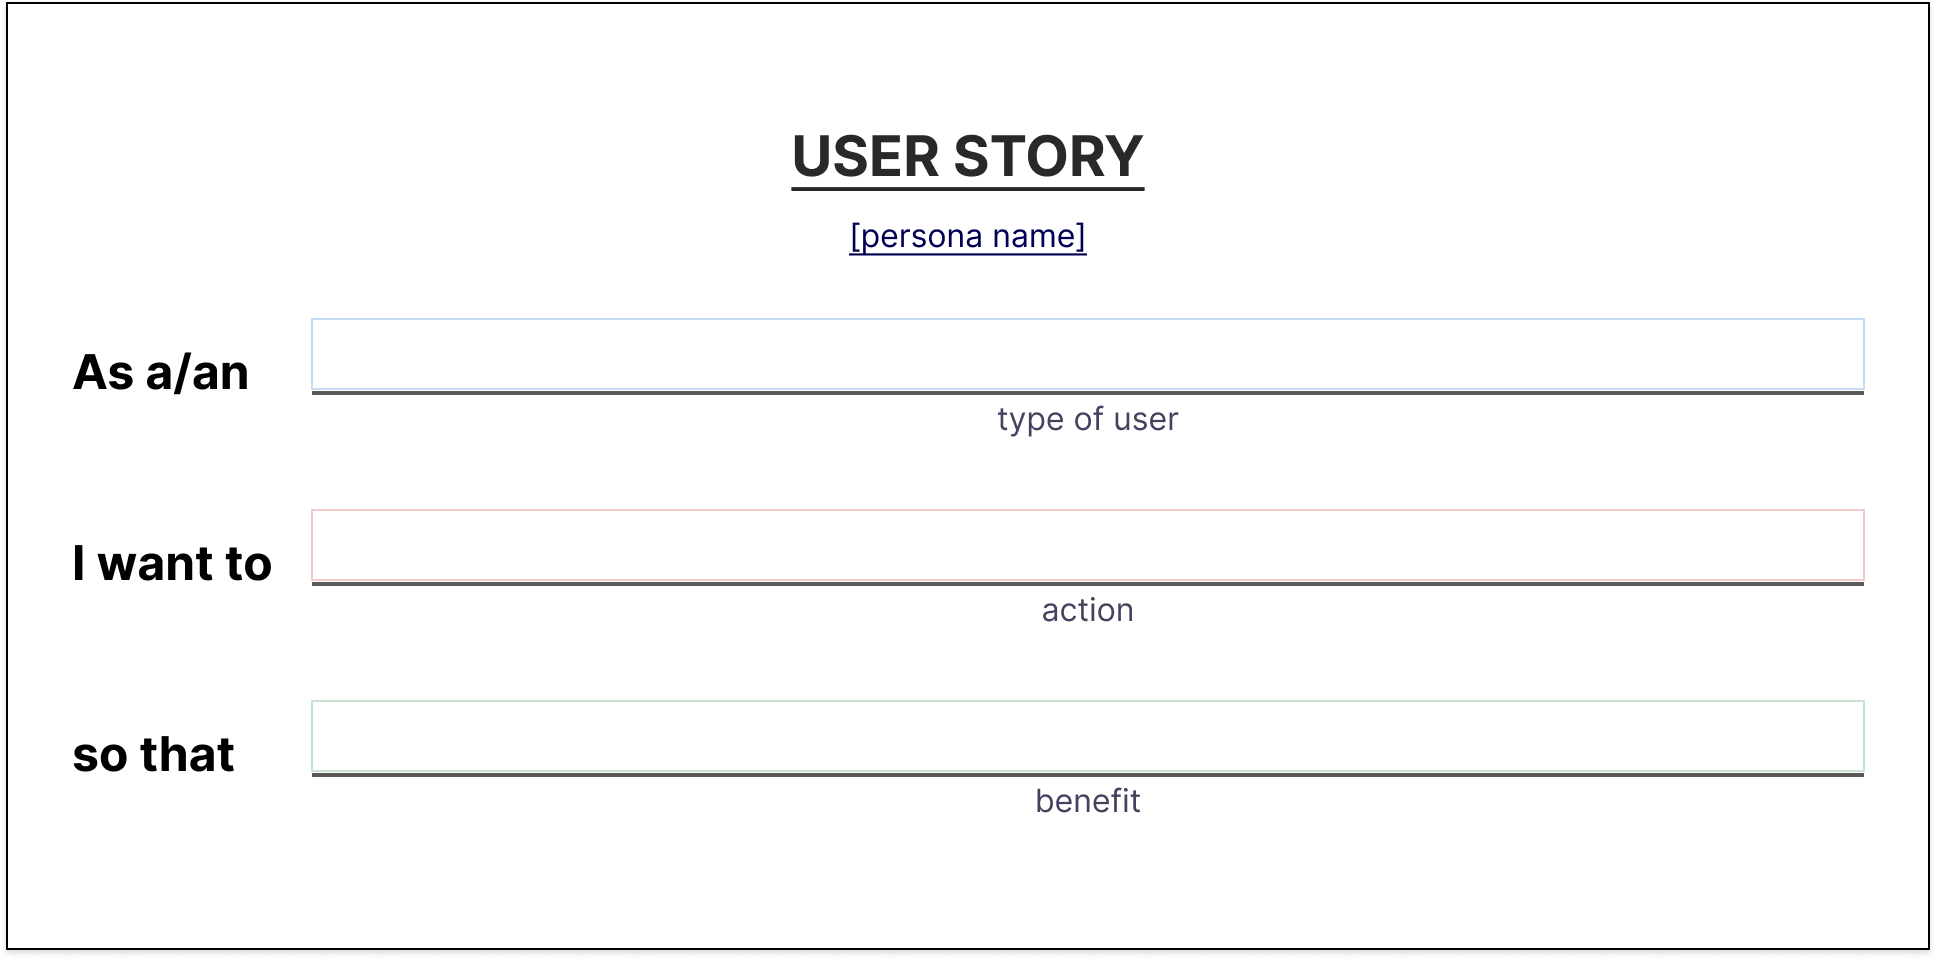 User Story template
When to use user stories?
User stories are particularly valuable when:
- The project’s scientific approach and technological implementation are still evolving. They provide flexibility in exploring potential solutions while maintaining a clear focus on user needs.
- You want to capture the core user problem and target audience without getting bogged down in specific implementation details. They help define the “who” and “why” before diving into the “how”.
- Your team needs creative problem-solving space. User stories give developers room to innovate and co-create solutions, even when they’re not directly collaborating with domain experts.
- You’re working in an agile or iterative development environment. User stories align perfectly with sprint planning and can be easily prioritised and adjusted as project understanding deepens.
- The project involves complex user interactions or requires a deep understanding of user motivations. User stories force teams to think from the user’s perspective, uncovering nuanced requirements.
When NOT to use user stories?
Avoid user stories when:
- The solution is well-defined and technically straightforward. In cases with clear, established approaches, more detailed technical specifications might be more appropriate.
- You require precise, granular requirements that leave little room for interpretation. User stories are intentionally broad and may not suit projects needing exact, step-by-step guidance.
- The project involves low-level technical implementations or infrastructure work where user perspective is less relevant. Backend optimisations or system-level changes might benefit more from technical specifications.
- Your team lacks the experience to translate user stories into actionable development tasks. Effective use of user stories requires skill in breaking down abstract user needs into concrete implementation strategies.
Why User Stories Are Effective
User stories are a effective tool for capturing requirements in a way that fosters collaboration, clarity, and creativity among diverse project stakeholders. Here’s why:
- Focus on Outcomes: Highlight what users want to achieve, making requirements accessible to non-technical stakeholders.
- Clarity for All: Provide a clear understanding of progress and priorities, helping stakeholders track work and identify opportunities to cut scope.
- Empower Developers: Offer context about user goals, enabling developers to create better solutions without rigid technical prescriptions.
- Encourage Collaboration: Use a shared language that aligns product owners, designers, and developers on what needs to be done.
- Adaptable Over Time: Allow requirements to evolve as understanding deepens, ensuring continued alignment with user needs.
Components of a User Story
A user story has two main components:
1. The User Story itself:
This follows a simple structure: “As a [user], I want to [do something] so that [I can achieve some goal].”
Example:
“As an environmental researcher, I want to download climate data in CSV format so that I can analyse it in my preferred statistical software.”
2. Acceptance Criteria:
These define how you know the user story has been successfully delivered. They are specific and testable statements that provide a clear definition of “done.”
Example:
“When I click the ‘Download’ button, the data should be downloaded as a CSV file with the date and time included in the file name.”
Steps for Creating User Stories
Step 1: Understand Your Users
- Conduct user research: Use methods like interviews, surveys, and observation to understand your target audience’s needs, goals, and pain points.
- Create user personas: Develop fictional representations of your ideal users based on your research. This helps you keep the user in mind throughout the process.
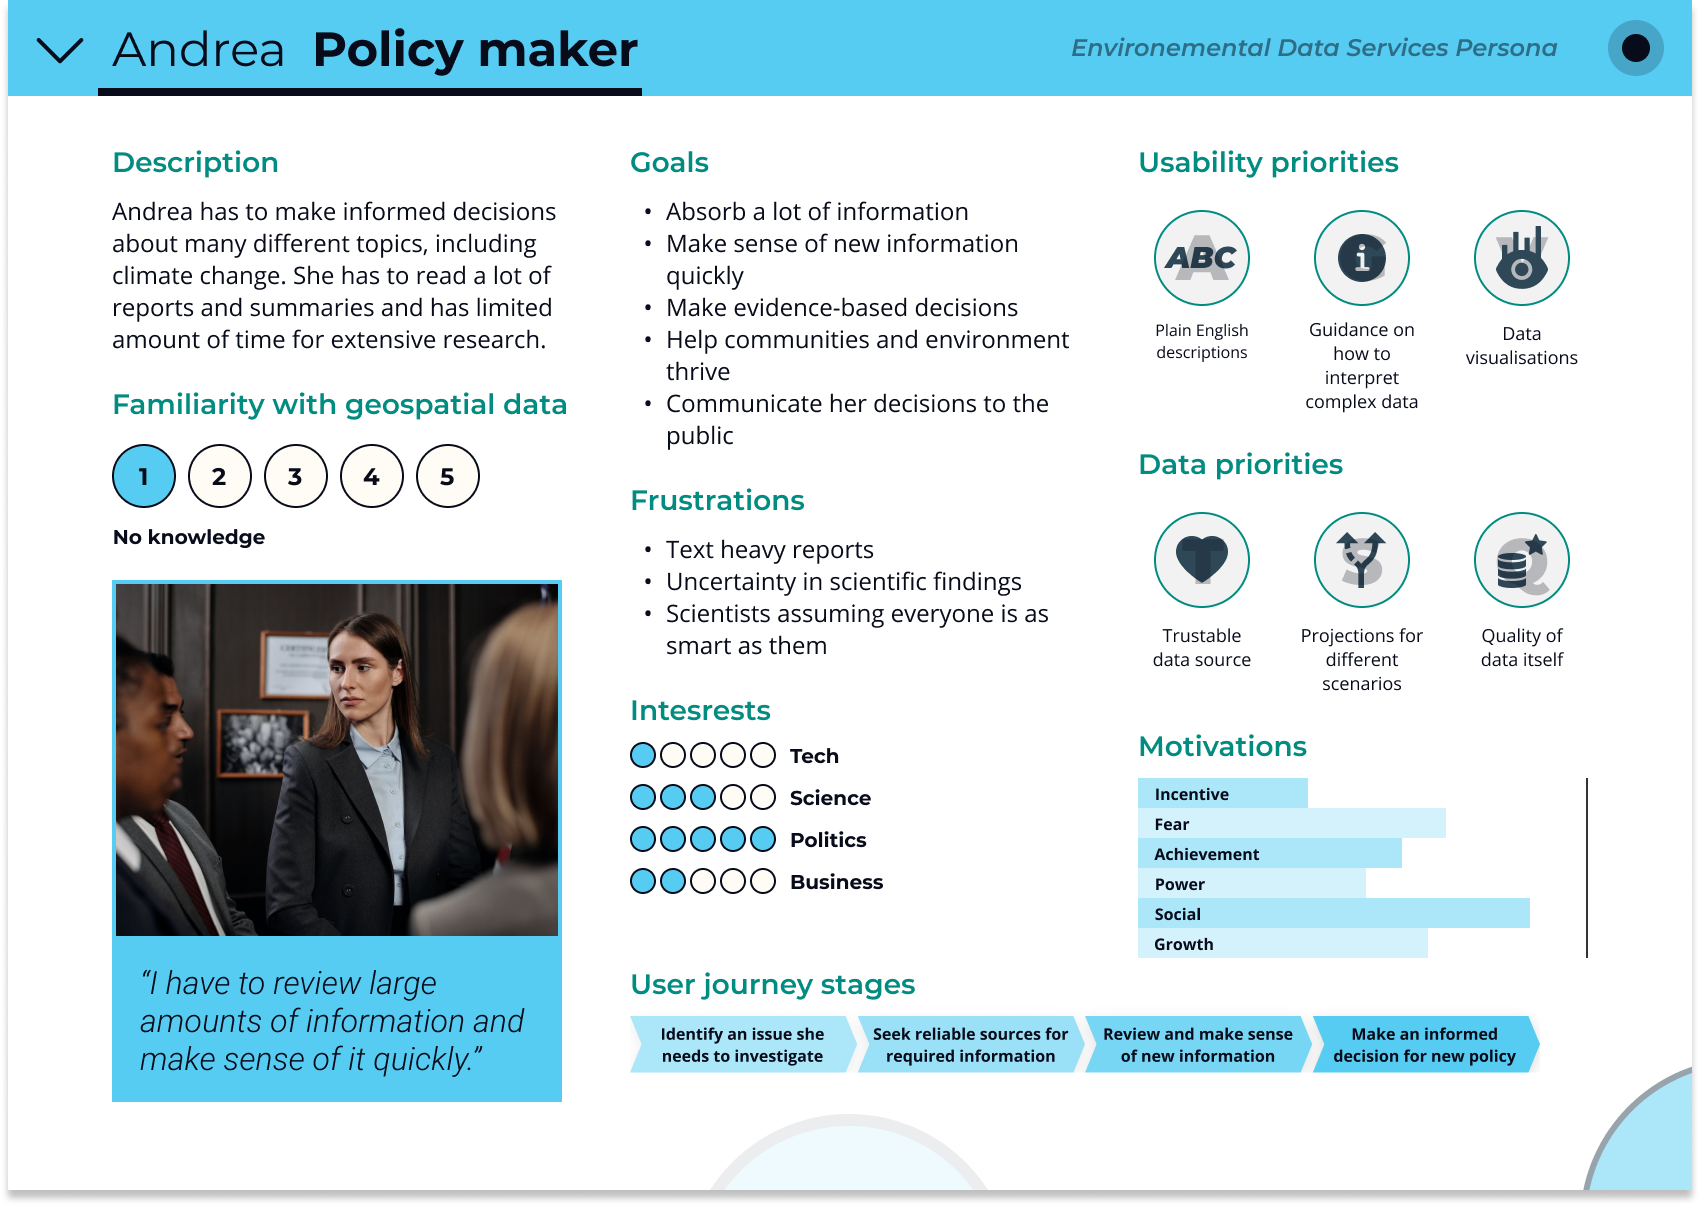 Persona example
Step 2: Craft User Stories
- Break down epics: Divide each epic into smaller, more manageable user stories.
- Use the user story format: “As a [user], I want to [do something] so that [I can achieve some goal].”
- Example: “As an environmental consultant, I want to filter air quality data by location so that I can assess pollution levels in a specific area.”
Read more user story examples.
- British Oceanographic Data Centre (BODC): As a marine biologist studying the impact of climate change on coral reefs, I want to access historical and real-time oceanographic data (temperature, salinity, currents) for specific reef locations so that I can analyse trends and predict future impacts.
- Centre for Environmental Data Analysis (CEDA): As an atmospheric scientist researching air pollution patterns, I want to download and process large datasets of atmospheric composition and meteorological variables from satellite and ground-based observations so that I can develop models to forecast air quality.
- Environmental Information Data Centre (EIDC): As a conservation manager planning a habitat restoration project, I want to access spatial datasets of land cover, species distributions, and soil types for my project area so that I can identify suitable locations for reforestation and monitor ecological changes over time.
- National Geoscience Data Centre (NGDC): As a geologist assessing the risk of landslides in a mountainous region, I want to query a database of geological maps, borehole records, and seismic data for the area so that I can identify unstable slopes and develop mitigation strategies.
- Polar Data Centre (PDC): As a glaciologist studying ice sheet dynamics in Antarctica, I want to access and analyse satellite imagery, ice core data, and meteorological records from polar research expeditions so that I can understand the processes driving ice melt and contribute to sea level rise projections.
Step 3: Define Acceptance Criteria
- Specify desired outcomes: For each user story, define clear and testable acceptance criteria.
- Use the acceptance criteria format: “When happens, [y] should happen.”
- Example: “When I select a location on the map, the data table should only display air quality readings from that area.”
Step 4: Collaborate with Design
- Visualise the user experience: Work with designers to create mockups or prototypes that illustrate how the feature will look and function.
- Attach designs to user stories: Include these visual representations with the user story to provide context and clarity.
Step 5: Review with the Development Team
- Ensure feasibility: Discuss user stories with developers to get feedback on technical feasibility and potential challenges.
- Use a project management tool: Maintain a backlog of user stories in a tool like Jira, Trello, or GitLab to track progress and facilitate collaboration.
Step 6: Score and Prioritise User Stories
- Estimate effort: Use a pointing system (like the Fibonacci sequence) to estimate the effort required for each user story.
- Prioritise based on value and effort: Determine which user stories deliver the most value to users with the least amount of effort.
 *Source: Writing User Stories, O’Reilly Media*
Step 7: Plan Sprints
- Schedule user stories: Group prioritised user stories into sprints, considering the team’s capacity and the sprint duration.
- Conduct sprint planning meetings: Hold meetings with stakeholders to discuss and finalise the sprint backlog, ensuring alignment on goals and priorities.
Step 8: Develop and Test
- Develop the features: The development team builds the features according to the user stories and acceptance criteria.
- Conduct user acceptance testing (UAT): Before releasing the feature, conduct UAT with real users or have the product owner test the functionality from the user’s perspective. This helps identify any issues or areas for improvement.
Step 9: Iterate and Improve
- Gather feedback: Continuously collect feedback from users after the feature is released.
- Refine user stories: Use feedback to refine existing user stories or create new ones to address evolving user needs.
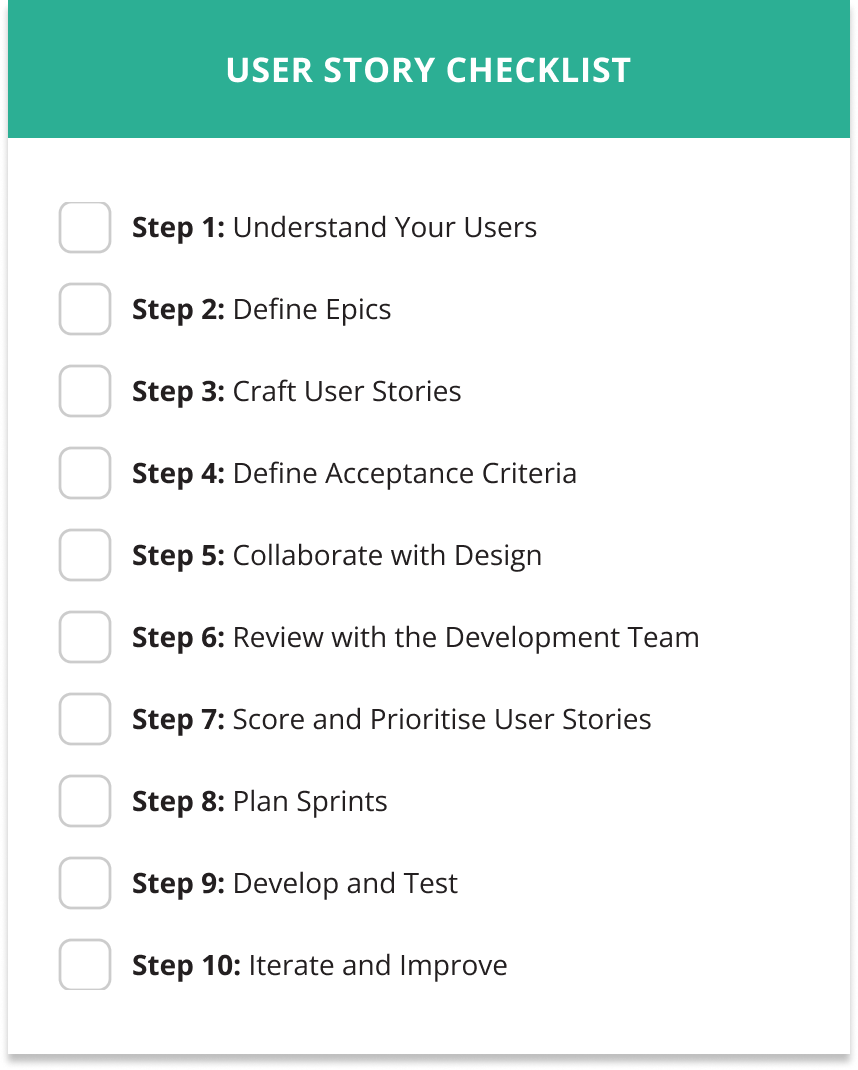
User Story Checklist
- Step 1: Understand Your Users
- Step 2: Craft User Stories
- Step 3: Define Acceptance Criteria
- Step 4: Collaborate with Design
- Step 5: Review with the Development Team
- Step 6: Score and Prioritise User Stories
- Step 7: Plan Sprints
- Step 8: Develop and Test
- Step 9: Iterate and Improve
Tips for writing effective user stories
Focus on Outcomes, Not Outputs
- Emphasise the value delivered to the user rather than just describing a feature.
- Example: Instead of “Add a filter option,” write, “As a user, I want to filter results so I can quickly find relevant information.”
Keep It Simple and Concise
- Avoid long or overly detailed stories. Break down large stories into smaller, manageable chunks.
- Example: Split a story like “As a user, I want a dashboard with charts, notifications, and filters” into separate user stories for each feature.
Collaborate with Stakeholders
- Include users, product owners, and developers in crafting and refining stories to ensure alignment.
Use Personas for Context
- Tie user stories to specific personas to make them more relatable and focused.
- Example: “As Alex, a data analyst, I want to visualise trends in air quality data so I can generate actionable reports.”
Avoid Jargon
- Use clear, user-friendly language to ensure accessibility for non-technical team members.
Prioritise User Stories by Value
- Focus on stories that deliver the most user or business value first. Use prioritisation frameworks like MoSCoW (Must Have, Should Have, Could Have, Won’t Have).
Use INVEST Guidelines
- Stories should be Independent, Negotiable, Valuable, Estimable, Small, and Testable.
- This framework ensures stories are actionable and deliverable within a sprint.
Conclusion
User stories are a powerful tool for ensuring that your product meets user needs while fostering collaboration across teams. By focusing on user outcomes, they make requirements accessible to non-technical stakeholders, clarify priorities, and empower developers to design the best solutions. When combined with thoughtful user research and cross-disciplinary collaboration, user stories help teams prioritise effectively, adapt to changes, and deliver products that address real-world challenges.
 Good user experience requires a balance of user needs, business goals, and technical feasibility.
References
- User Stories Applied: For Agile Software Development
- The Art of Crafting User Stories
- Writing User Stories Online Course
- User Story Mapping: Discover the Whole Story, Build the Right Product
- A Simple Guide to Writing Better User Stories
- Requirement Specification vs User Stories
- INVEST in Good Stories, and SMART Tasks